Showing posts with label buttons. Show all posts

Thursday, September 29, 2011

*****Melli & Moi*****

My great niece has been with us for a week and boy have we had some fun. Mel or Melli loves to craft as I do so we have had almost a full week of playing. She decribes my work area as a sweetie shop and non fattening into the bargain. So I thought I would show you a few things we came up with.
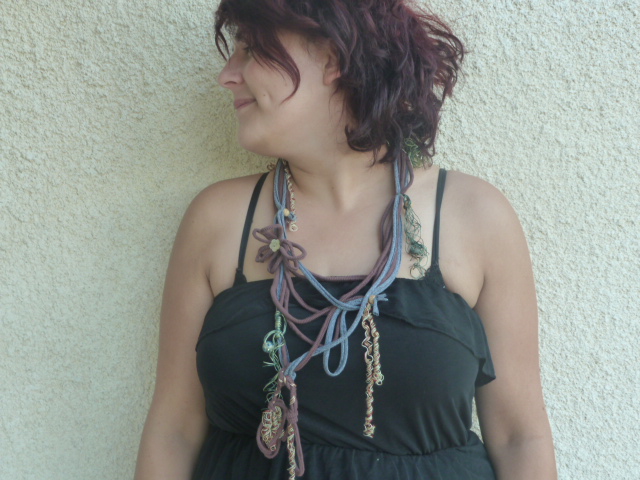
 The necklace above is a mixture of old T-shirts and the cord from a curtain tieback along with a few beads(we used the inside cord for a necklace further down the page)
Dahlia flower with a lace wrapped rose brooch
 
Rosette hair/dress clip
Headband with three suffolk puffs
Knew I would find a use for my old dress
Tartan hair clip
Friendship necklace

Mellie showed me how to make a  friendship bracelet, loved how simple and fun to make it was, so we took it to another level by making it into a necklace, the one above was made by using the inside cord of a curtain tieback, we removed the outer threads and then made the necklace with seven strands, then added suffolk puffs with little mop buttons for the centre. I found a site which has a tutorial for making the bracelets/necklace and they are easy and take about an hour and very theraputic. Here's the link if you fancy trying one for yourself.
 Friendship Bracelet from  greeniedressesforless.

Melli also loves making cakes and is looking at training for advanced cake making. Here are a couple of her cakes. Thanks for a fun week Meli xxx

Thursday, July 14, 2011

***Vintage Lace Candle Sleeve***

I am constantly trying to think up ideas to use my vintage lace, this morning as I was washing out my little glass yogurt pots (which I keep and use on the table when eating outside on a night with little tea light candles) and tada came up with a sleeve to cover them using my vintage lace. So I thought I would share them with you as they look really cute and hides the boring glass jar, also creates a lovely glow and ambience.


Your Ingredients

1. 23cm (9")  x 10cm (4")  of lace
2. Three  5cm (2") circles cut from either lace or voile (this will make the flower)
3. A couple of beads or buttons
4. Heavy duty iron-on interfacing 23cm (9") x 7.5cm (3")


I decided a French seam would look better so after ironing on the interfacing fold the lace in half and wrong sides together, stitch a narrow seam.
Now turn inside out so that the interfacing is now facing you, then stitch another narrow line which will hide the first line of stitches and you will be left with a normal seam on the outside and a ridge on the inside. Looks better than an open seam.


showing ridge on inside
Now turn again and it's ready to use or add a few buttons down the seam or a flower I added a lace flower on mine with a little pearl bead.

If you want to make the flower, lay one circle flat and then take another  circle and make a fold so it should look like this (looks a bit like a coffee filter) then repeat the process with the next circle.

Place the two folded circles so that the pointed ends are together and then stitch through all layers, then attatch your bead or button.

Attach to the seamed side and that's it


I am sure I don't have to mention this but don't use these over just a candle as they are sure to go up in a puff of smoke. If  you do make any would love to see them. I am off to make a few more as I think they would make great little presents. Might even add some to my shop :)

Sunday, July 10, 2011

My Little Model

I showed Poppy my work area and she was wowing and her head was going all over the place looking at all the bits and bobs on my table, which to my shame is still as untidy as it was a few months back when I promised myself to clear it up. Still, she managed to find a little button with a Dolphin on it (Never seen that one before myself). Apart from the adhesive which I wasn't going to let her do (which earned me a very un smiley face for a few seconds!), she choose the buttons and we made these two rings for her.


Quite the little lady.

Monday, April 25, 2011

*****If Buckles Could Blush*****


I was sitting at my desk surrounded by all my buttons and other bits and bobs, as I reached out to pick up my tweezers I knocked a box of buckles over and a blue one landed on my lap and begged me do something with her. What would you like to be?  of course buckles don't speak (well mine don't) but they are very good at planting ideas, so after laying her to one side I then started to imagine colours that would go with the blue, it took me 3 weeks to find all that I needed and here she is what do you think of her?


The first piece I added was a vintage earring with silver grey beads, black & silver striped beads and a silver filigree bead in the centre. Much searching went on and then I remembered a friend had given me a few silver toggle buttons with cute little flowers so that was next. Hmm, so far so good but now what! None of the blue buttons I have worked on her, then my little eye fell onto a diamante belt and so cut a length of and swept it over the centre of the buckle. Next came the vintage white glass button but it looked bored sitting there on it's own so, a little bit of chain and the end of the belt added.

Nearly done but still had to find something for under the toggle button ah ha! two shell flower buttons did the trick and a length of rosary beads and a little pearl popped in the middle. Then I found the key and that was the last piece. For the back I covered it with some baby blue silk and then added a bail and well now what do I call her?


Sunday, May 23, 2010

Hair Stick Tutorial


My daughter arrived yesterday for 5 days and so we thought we would do a few things together just for fun and here's one of them.


She has very thick curly below shoulder length hair, and she wears her hair up a lot, and therefore always on the lookout for new things to do with her hair, so I decided to make her some hair sticks.

So using a 6mm piece of doweling I cut a 15cm length and then shaped the end using a pencil sharpener and then sanded it smooth. The other end sand until it takes on a roundish look! then use a 3mm drill bit and drill through the centre of the stick 5mm from the end .

I sent her off to gather together a few beads, buttons and whatever else took her fancy that she thought might look good dangling and off we went.

I used a piece of chain 8mm in length and added shell buttons in two sizes using the jump rings to attach and that's it, hair stick done ready to go. My daughter wore this last night and have to say it looked great and she loves it so we are going to make a few more later.


Hope you like it and try it out for yourself.


Related Posts Plugin for WordPress, Blogger...